

How to Install Outdoor Lights on Brick
Source: https://homesteady.com/
Installing outdoor lighting on brick may seem like an extremely difficult task to complete. Most are under the misconception that the existing brick structure will need to be disassembled in order to install and hide the wiring. In most cases conduit can be used to run the wires to the location desired. The conduit will hide the wires and can be decorated to match the brick or hidden behind a plant. Solar lighting is another option for outdoor lighting.
Electrical Lighting
-
Locate a ground fault interrupter (GFI) outlet closest to the location where the lights will be installed. The GFI is a specific outlet meant for use in areas that are susceptible to moisture. When the outlet gets wet, it automatically shuts itself off.
-
Measure the distance from the outlet to the location. This will determine the amount of conduit and wiring needed to wire the lights. Determine the shortest distance for the wires to run. For example, against a house, underground, under a porch, or patio.
-
Run the conduit from the outlet to the desired location in the path predetermined. Dig a trench for the conduit to be buried 6 inches below ground level, if needed.
-
Slide the wires through the conduit. Allow the wires to come out the opposite end of the conduit approximately 1 foot. Do not connect the wiring to the outlet. Leave it laying next to it or on the ground.
-
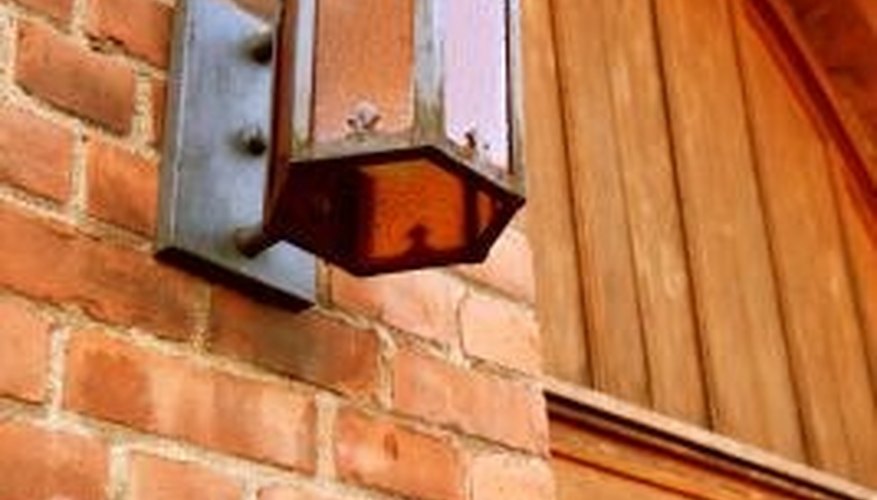
Hold the lighting fixture against the brick structure in the desired location of installation. Trace around the base to mark that location on the structure. If a template was included in the lighting kit, tape it to the structure instead. Avoid lining up the hole marks for the screws on a mortar joint.
-
Place the masonry bit and screw on a flat surface side by side. Mark the length of the screw on the drill bit by wrapping a piece of tape around the bit. This will inform you of the depth needed for the screw. When the tape is touching the surface of the brick the bit has been entered in far enough for the screw to fit inside.
-
Drill the holes for the lighting fixture. These will be marked on the template, or previously traced. Hold the drill level to ensure that the hole is straight. Most drills have a level on them to assist with this. If the one you are using does not have one available, hold it level as best as possible.
-
Insert the appropriately-sized screw plug into the hole. It will not push into the hole easily. It will need to be forced in with a hammer. Do not hit the plug with excessive force or it will bend the plug or ruin it. Tap the plug gently, and repeatedly.
-
Attach the conduit to the brick structure using clamps. Follow the same process outlined in Step 5 through Step 8 to insert the screws through the clamp and into the brick.
-
Connect the wires to the back of the lighting fixture as instructed by the manufacturer. Push the excess wire into the conduit.
-
Attach the lighting fixture to the surface of the structure by inserting the screws into the preinstalled plugs.
-
Plug the wire into the GFI light to ensure that the light is working. Attach the transformer to the wall closest to the GFI. Ensure that the transformer is in a location that receives the most sun light. Follow the same process outlined in Steps 5 through 8, if needing to be installed on a brick wall.
-
Fill the trench with the dirt previously removed. Tamp the dirt into place by walking on it or using a tamper
Solar Lighting
-
Determine the best location for the solar lighting to be installed. A location that receives the most amount of sunlight during the day will produce a longer brighter light at night.
-
Repeat the process outlined in Steps 5 through 8 in the Electrical Outdoor Lighting section to attach the lighting fixture to the brick structure. The light has a sensor that will automatically turn on the light when the sun sets and turn it off when the sun rises. It will soak up the suns rays during the day to power it at night. The first night it may not turn on or may have a weak light until it has an entire day to charge.
-
Remove the cover on the solar panel on the light. Some solar lights come packaged with a piece of tape blocking the solar panel from determining if it is night or day and prevent it from working until a consumer installs the light.

pfizer viagra canada pharmistry https://canadaviagrastore.com/ buy viagra from canada?
priligy pills for sale dapoxetine india
best viagra pills 25 mg canada pharmarcy https://canadaviagrastore.com/ what is the price of generic viagra in canada
sildenafil 60mg price https://eunicesildenafilcitrate.com/ best price for generic sildenafil
40 mg tadalafil https://elitadalafill.com/ tadalafil max dose